 The Deer Stand Ladder
Materials List:
Build the Ladder ← You Are Here!
Build the Top Deck and Seat
Assemble The Stand
Setting Up and Moving The Stand
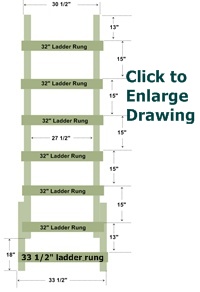
The ladder assembly diagram is shown on the left. A larger version of this diagram is available by clicking on the image or clicking here. You should print this diagram out before starting assembly.
You will need six of your 32" pieces, your 33 1/2" piece, two 36" pieces, and two 8-foot pieces of 2x4. Also, you will need 12d common galvanized nails and 6 quarter-inch carriage bolts, washers, and nuts.
Start by fastening the 36" extenders to the bottom of the ladder as shown, with 18" overlapping the 8-foot pieces. Use 3 carriage bolts on each side. You may easily make this stand higher by using longer extenders or additional extenders and an extra ladder rung for each additional 15" of length. Using additional extenders will widen your base even more, making for a more stable stand - this is what I would recommend if you wish to add height. At any rate, if you use carriage bolts instead of nails to fasten the extenders, you may remove the extenders for storage and transport if needed.
Measure 13" from the tops of the vertical ladder supports and nail your first 32" piece partially with one 12d galvanized common nail on each side (just enough nail to hold in place). Then measure 15" from top of this rung to the top of the next rung and partially nail with one nail on each side. Continue all the way down until you have all the rungs in place, as shown. Note that the bottom rung is only 13" down from the second lowest rung. When you double check all your rung positions and everything looks OK, nail all your ladder rungs in place with two or three 12d common galvanized nails on each side.
Make sure not to make the top width any wider than 30 1/2". The ladder must be able to fit inside the top deck of your deer stand shown in the next step! See this illustration.
NEXT STEP → Build the Top Deck and Seat


