Menu
Home Page
Freestanding 15ft Box Blind NEW!
Bi-Level 15ft Box Blind
Bi-Level Box Blind Roof NEW!
Crossbow Blind
The ONLY Foldable Chimney Deer Hunting Blind!
Portable Box Hunting Blind!
Box Deer Hunting Stand
Ladder Deer Hunting Stand
Ground Hunting Blind
Easy Tree Deer Stand
Deer Hunting Basics  More Deer Hunting Articles
About This Site
Links
More Deer Hunting Articles
About This Site
Links
Ghillie Suits as Low as $49.95!

|
 Step 1 - Assemble 12ft Vertical Legs Step 1 - Assemble 12ft Vertical Legs
Materials List:
Cut Out and Paint The Sides
Prepare Lumber, Ladder, and Roof
Assemble The Deer Stand ← You Are Here!
If you have not already done so, you need to assemble your 12-ft legs of your deer hunting stand by fastening (2) 8-ft 2x4's and (2) 4-ft 2x4's as shown left. Use 20d galvanized common nails and connector plates. If you are using 4x4's this step is not needed.

Step 2 - Attach 48" pieces to 4x4's & Fasten Nailing Boards
In this step, you attach (3) 48" 2x4 pieces and (1) 48" 1/2" OSB (or plywood) strip as shown on the left. The 48" pieces should extend out exactly 1 1/2" beyond the edges of the 4x4, as shown.The purpose of the lower 2x4 and OSB strip is for fastening to your tree. The OSB strip is a "spacer" strip that also will support the edge of your front panel until you can fasten it.
Also, in this step, fasten 16" long side supports to the fronts of the 4x4's, 48" from the top - the OSB sides will be fastened to these.
You should now attach your nailing boards to your tree. You may use as few as one or as many as needed. Note that if you use more than 2 such boards, then you will want to attach additional support pieces from your front corners to the tree - in this stand I ended up attaching 3 such additional supports, two on bottom corners and one on the top corner of my deer hunting stand. To fasten these nailing boards I used both long pole barn spikes and 20d galvanized nails (never use only pole barn spikes!). Photos of both types of supports are shown below.
 |
 |
 |
Step 3 - Fasten Front, Then Fasten Front Panel
First, you must fasten your front frame to the nailing boards, as shown in the photo directly above. You will fasten through the lowest 48" long 2x4. You should use your small level to get the front as level as possible. You will probably need to place 2x4 pieces under one leg to obtain a level state. Fasten your deer hunting stand in place with 20d nails and 1 or 2 long pole barn spikes.
With a bit of help from someone, lift the front panel in place, allowing it to rest on the 1/2" thick thin piece of OSB attached in Step 2. Fasten the front panel so all edges are flush with the 48" wide pieces. At this point, only use a single deck screw at each corner so you can easily move the pieces a little if needed in later steps. After all sides are on you will pound in more nails at each corner and into the corner supports. At this point, you will proceed to attaching the remaining 4x4's, diagonal supports, and decking before you attach any more sides. |
  |
Step 4 - Attach Remaining Posts, Diagonal Supports, & Deck
Start by attaching (2) 44" long pieces as shown left with several deck screws. Then attach the remaining 4x4's and 48" end piece, also as shown left.
Use your small level to get all legs and sides of your deer hunting stand fairly level and then attach the (4) 5-ft long diagonal supports as shown.
Attach two 44" deck supports, about 14" from each side, as shown on the left. Also attach (4)16" decking supports, one one each corner as shown. Lay out the decking so you have 6 pieces, spaced apart by the diameter of a 20d nail (I found it helpful to temporarily tack the nails in place). Then use your hand saw to cut out the corners of the last two pieces of decking, as needed. Attach all decking with 10d galvanized finish nails. Note that the 16" supports are needed to support the ends of the final two cutout pieces.
At this point, you will have a sturdy structure to work off of to attach the remaining 3 sides and roof to your box style deer hunting stand. |
  |
Step 5 - Attach Top Wall Supports, Corner Supports, & Sides
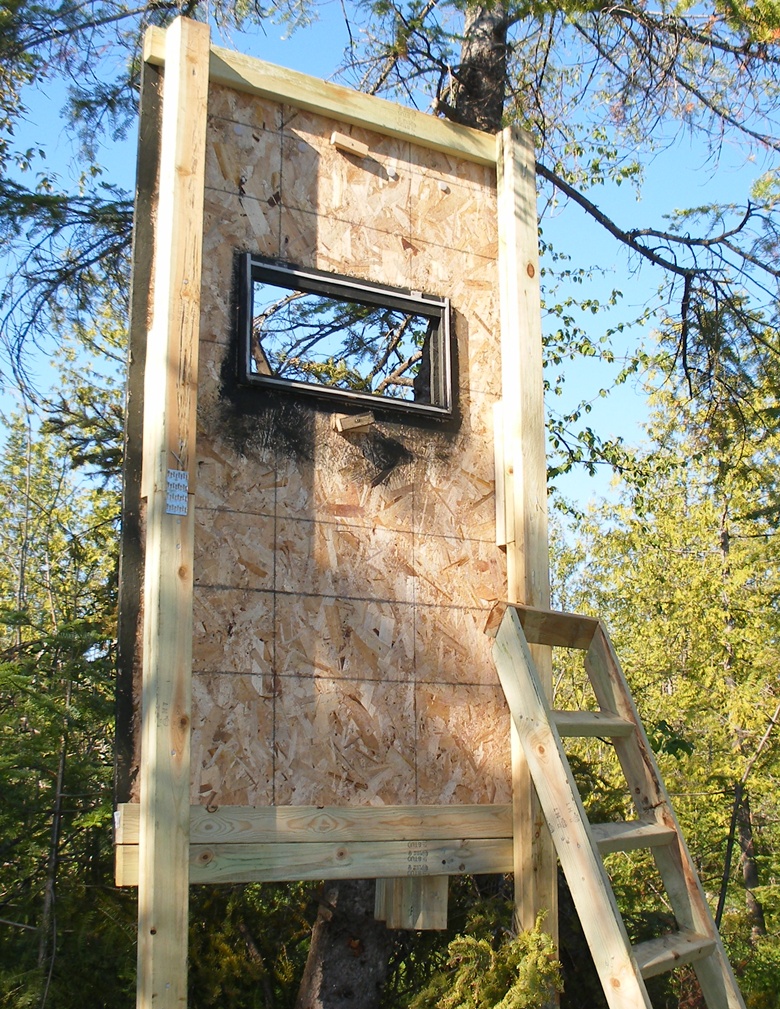
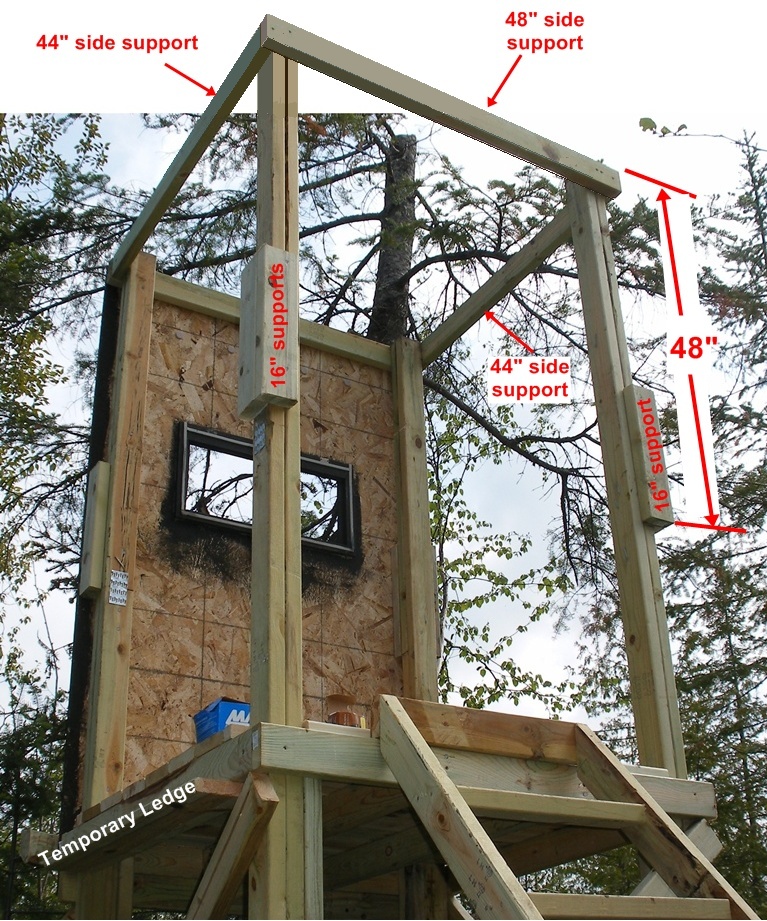
Start by attaching (2) 44" side supports and (1) 48" side support at the tops of the 4x4's, as shown to the left. Also, attach remaining (6) 16-inch side supports to all 4 corners of the 4x4's so that all sides may be securely fastened at the corners midway from top to bottom. Position the 16" supports as done in Step 2. You should also temporarily attach a ledge board at the bottom of the horizontal side support for the OSB (or plywood) side piece to rest on while you attach it.
Now, attach the sides, starting with the side left of the door (as pictured left). You may rest the side piece on the ledge board and have a helper hold it in place while you fasten it. The ladder, rested against the side piece will also hold it in place well. Note that the front and back sides are flush with the edges of the 2x4's and the left and right sides overlap. To make and even better seal, you can apply a bead of caulk where the side pieces butt up against each other at the corners before you put the pieces up. To help square up sides, especially on that last piece, I found that I could force the side flush by temporarily screwing in a small piece of 2x4 on the adjacent corner to push the side in flush, as shown here.
|


 |
Step 6 - Fasten Roof, Ladder, Door and Window
If you have not already done so, attach the 44" 2x4 roof support, centered in your overlapping roofing to obtain a roof of dimensions 5 ft by (about ) 4 1/2 ft, as shown below. It is helpful to use duct tape to temporarily tape your pieces together, then carefully flip and fasten with rubber-grommeted screws.

Carefully place the roof on top of the stand. The 44" support should drop into place nicely. Position your roof so it is centered. Then fasten the ends of the 44" piece to the side supports, from the outside, or from the inside, if access from the outside is blocked.
Add several more rubber grommeted roofing screws near each corner through the top of the roof - use extreme caution as this requires you to get up over the roof. An extension ladder (and helper) is recommended!
Attach your ladder with screws and nails and reattach your door and your plexiglas's window (if used), as shown bottom left. Your homemade box style deer hunting stand is done!
|
|

Share on Facebook
Click Ctrl D to Bookmark
This Page! Tell Your Friends! Click on The Share Button =>

|